Instead of telling you about something that you could do, and I know in theory, I'm just going to let you know how I did it. This blog in a few minutes in Azure, and the best of all, for free.
I'm mentioning a blog here, but you can deploy whatever you want to, you can start from scratch, migrate an old solution or pick something from the MarketPlace, It's really up to you. Any technology, any language, with Azure you can do anything, your imagination and creativity is your limit.

1st Step - Get your FREE Visual Studio Dev Essentials account

That's it, you're set to go! There are a LOT, of benefits such as Pluralsight access, Visual Studio Community and Code edition, Visual Studio Team services, Xamarin University, app Insights and many more. Just explore the benefits and the good news is that, often things change, for better.
Let's just focus on one of those benefits the "$25 monthly Azure credit".
Activate it and you will be taken to the new Microsoft Azure Portal.
The Microsoft Azure Portal is where the magic happens. You can spin new Virtual Machines, new app services, databases, a gazilion of stuff. In this case, we're going to setup a blog.
 1 - On the menu on your left, you should have a few options to start things going. For this case, let's pick the fourth option on the menu "app services".
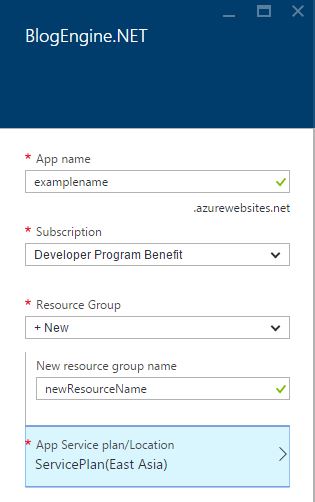
2 - You can browse for the options, or you can simple use the search box to find what you want. As you may see below, I've been poking around with some options and Azure is reminding helping me find my latest viewed itens. In my case, I chosen the BlogEngine.NET, but you can pick any of the options. Just beware that, some options may require databases or other services that may have costs, and for this one, you can start your blog without a database.
3 - The Azure portal uses this concept of "blades" as new display panels where the context info will be shown, so, as you click the options, more panels will be opened on your right, just go through them until you get the "Create" button.
4 - You will reach a panel where you you are asked to provide an "app name", be sure to pick a unique name, Azure will help you here and a green tick will be shown if the name is available and it's allowed to use.
Be sure also to pick a Subscription, if you are using the Developer Program Benefit, pick that option.
If you have no Resource Group created yet, you will be prompt to use a default one, but you can pick "New" and go through the process, just beware that, different resources will have different costs. Be sure to start low, with the free or cheaper ones, and then, if necessary scale up.
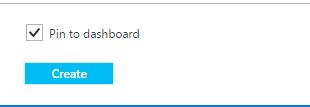
 5. Check everything and hit create. You can, and for ease you probably should, check the tick to add to pin to dashboard.
Now please sit back, relax and give the Azure some time to set things going. It will take a couple of minutes and you're ready to go.
For more information, I would suggest you to take some great content on MVA - Microsoft Virtual Academy, here are some examples:
Instructors | Jon Galloway - Microsoft Technical Evangelist; Cory Fowler - Microsoft Azure Technical Evangelist; Apurva Joshi (AJ) - Microsoft Senior Program Manager
Instructor | Bob Tabor- Microsoft MVP
All of them awesome instructurs, and I'm pretty sure you'll find your way from here. Please feel free to drop me a line about what you're up to.
Cheers,
Ricardo Melo Joia